Wednesday, 21 December 2011

Torrone


The holidays are here in full swing and it has been mad around my home. Having 3 little boys sure can make Christmas special. But, it sure has been far more challenging getting my baking done with a little one yanking on my legs…lol. These gorgeous little gems are called Torrone, a traditional Italian candy.  They have totally become my favourite holiday treat. Not only are they so pretty and festive looking but they are amazingly delicious and EASY to make.  


Torrone


Ingredients


500 g marshmallows
500g vanilla wafers
500g bakeable jujubes
a few sheets of rice paper


Pour the marshmallows in a large bowl and place in the microwave. Heat for 20 seconds at a time and stir. Do not over cook. Just heat it enough to melt, and stir frequently.
Then in another bowl melt the vanilla wafers in the microwave, also stiring in 20 second intervals to ensure it does not burn. When melted add to marshmallow fluff, mix well. You can place the mixture in the microwave for a few seconds if you find it too cool to stir well. Again, be careful not to overheat.
Then add your candy and mix it together.


 Line a cookie sheet (10 x 15 in) with raised edges with rice paper (shiny side of the paper down). If you have to cut the paper to fit that's ok, but make sure to overlap it or your marshmallow mix will seep through the cracks and stick to the pan. I used zig zag scissors and it looked cute :) You can find these ingredients at your local bulk food store.


Once you have the rice paper down, pour the marshmallow mixture on the paper. This can be a touch trickay as it is sticky. Grease your hands so they don't stick as you press the marshmallow down. A spatula can also be really useful for spreading the mixture out. Keep working it until you fill in the pan from edge to edge. Once most of it is spread out place the rice paper on top as well (shiny side up now). 
Here's the fun part that kids will love. Place another pan inside (9 x 13 in) and step all over it. Stomping and pressing down to flatten the candy.


Put the candy in the fridge for a little while just to harden so it's easier to cut up. Using a pizza cutter is a great way to cut this treat into pieces. I don't bother making sure each and every piece gets cut into the same size. It gets eaten right away anyways, plus I like the homemade chunky cuts and displaying it on a pretty plate or festive jar.


The finished product looks so pretty and makes a great gift idea. I guarantee if you make this once, you'll make it many times over year after year.

Happy Baking…Happy Holidays….enjoy!

Amanda

From our house to yours….Merry Christmas

Monday, 28 November 2011

Pottery Barn Kids Lazy Susan


Ok, so I just HAD to blog about this. Recently I ordered a few pieces of furniture from Pottery Barn Kids (btw…totally happy with the purchases) I hummed and hawed about getting this and finally decided to go for it.
This little lazy susan is so simple yet so smart. It is just so nice to look at and so incredibly handy. I was not sure if its use would be any different then any other plastic container or bucket but it has become a handy goto homework organizer in our household. When Cohen has homework I pull out his books and plop the lazy susan in front of him. Everything he needs is there, nicely organized. And, he thinks it's neat so it makes him want to do his homework…hehehe.
I highly recommend this for any study space or craft area.


http://www.potterybarnkids.com/products/mini-lazy-susan/       $35.00

Pumpkin Corn Chowder


It's been so busy lately, but today I decided to clear my schedule so I could get some cooking and blogging done. I've got a few recipes up my sleeve that I want to share in the next few weeks. I know we're getting right into the busy holiday season now, but it's the best time to share new recipes with family and friends. This past weekend we were busy Christmas shopping and pulling out the decorations, which meant we ate out alot. I was so glad to make this homecooked meal today, I hate feeling all garbage-y from eating out too much. This dish really made my tummy feel cozy. I came up with the recipe last fall and it was an instant hit. I hope you like it too.


Pumpkin Corn Chowder

Ingredients

1 medium onion diced
6 slices of bacon chopped
10 fresh sage leaves (thinly sliced)
4 tbsp butter
4 tbsp flour
2 cups whole milk
1300 ml chicken stock
1 can cream-style corn
1 can pure pumpkin
1 tsp salt
4 small-medium potatos diced
cracked pepper to taste


The fresh sage smells wonderful!


Dice your onion and bacon


 Saute the onion and bacon in 1 tbsp of butter and 1 tbsp of oil


I like my bacon crispy, so I saute my onions so they are carmelized and the bacon is a bit crispy. At this point you can add your thinly sliced sage. It will crisp up with the onion and bacon. 


In a seperate saucepan melt your butter on medium heat. Once it is melted add the flour and whisk for 1 minute. Then, slowly add the milk while continuously whisking.


Keep whisking until it starts gently bubbling. Then slowly add the broth while whisking. The key to a nice smooth chowder is to keep whisking! We don't want any clumps!


Add the 1 tsp salt, onion and bacon, pumpkin, and corn to the broth mixture. Mix it up well. This is where the flavors start coming together. 


Toss in the potatos. I like to dice my potatos a bit smaller, so they are bit sized. Everything else in the chowder is quite small, so a big chunky potato would throw it off, but you can make it to your personal preference.


Simmer the chowder on low heat for 1 hour. Make sure to stir it occasionally. Garnish with fresh sage and serve with fresh bread or a cheesy grilled cheese sandwich. We had it with cheese toast….what can I say, I ran out of time. Off to hockey practice we went. 


Thanks to my adorable little man Emmett for cooperating while mommy made dinner and blogged about it!


p.s with your scrap sage twigs and wilted leaves you can make a wonderful all natural air freshener. In a small saucepan add 1/2 cup water, throw in sage pieces, a couple slices of lemon, a squeeze or two of lemon juice. Simmer on lowest setting for a fresh and clean scent.


Once again, please bear with me while I try and get the camera to do what I want it to. (Doesn't always happen :D )


Happy cooking….enjoy!

Saturday, 26 November 2011

Maple Chili & Cheesy Cornbread

So this is my very first post for Aprons & Pearls...Yay! I am admittedly a food addict. I love to cook, I love to eat, I love to look at food, I love to hunt out new and delicious recipes, and I love to do a snacking dance! I am still very amature at photography, but I have always had a great interest in it and am currently self teaching, so bear with me while I learn new skills. I am going to start out with one of our family favourites....Maple Chili & Cheesy Cornbread.
This is one of the yummiest meals you can find for a cold and rainy day. It is so warm and comforting. My 6 year old requests it all the time. The best part is that it's so quick and easy to make.


Maple Chili

Ingredients

1 medium onion diced
1 green pepper diced
2 cloves of garlic
1 lb ground beef
28 oz diced tomatos
10 oz condensed tomato soup
167 ml tomato paste
19 oz dark red kidney beans
14 oz maple beans (or if unavailable pork & beans and 1/4 cup maple syrup)
14 oz cream corn
2 cups water
2 tbsp chili powder
1 tsp garlic powder
1 tsp cumin
1 tsp onion powder
1 tsp salt
1 tsp beef boullion

Start by dicing your onion and green pepper, small bite size pieces work best.


 In a large pot, brown your ground beef. I like to use a pastry/dough cutter to "mash" the beef so the texture is fine. If you like a "chunkier" texture, use a wooden spoon to break up the pieces.


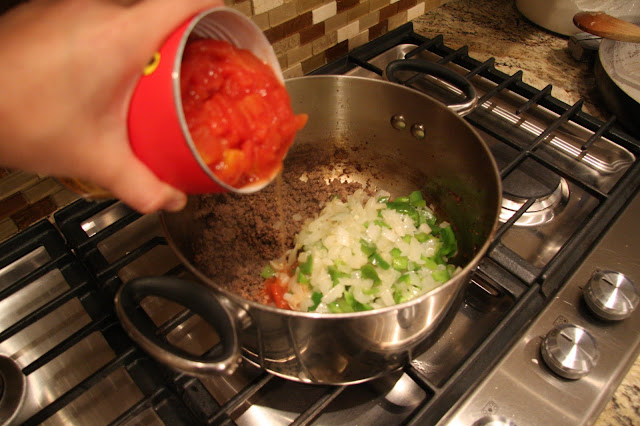
 Add the minced garlic cloves, cooked green pepper and onion  to the cooked beef, continue to cook for 2 minutes. Add your diced tomatos, tomato soup, tomato paste, beans (don't 
drain the maple beans, this part adds the maple flavour), creamed corn and water. Mix.


Now begin adding your spices. Chili powder, garlic powder, cumin, onion powder, salt, and beef boullion. If you didn't have the maple baked beans and need to substitute, now add the maple syrup.


Simmer on low for 1 hour. 


Now for the Irresistable Cheesy Cornbread

Ingredients

3/4 cup butter
1 cup white sugar
4 eggs
14 oz can creamed corn
1 cup shredded Monterey Jack cheese
1 cup Cheddar cheese
1 cup flour
1 cup cornmeal
4 tbsp baking powder
1/4 tsp salt


Preheat your oven to 325 degrees F. Start by melting your butter and pouring it into your mixing bowl, add your sugar and beat until well combined. Once combined keep mixer going and add your eggs one at a time. Slow your speed down and add your creamed corn and cheese.


In a seperate bowl mix together your dry ingredients. Then slowly mix it into the wet mixture until well combined.


Lightly grease a 9x13 in. baking pan. Pour your mixture into the pan and distribute evenly. Bake for 1 hour until the cornbread is golden brown around the edges. For a delicious light cruch on the outside, increase your temperature to 350 degrees F for the last 15 minutes. I LOVE it this way.


I also love to serve this dish with the cornbread right on top. It crumbles ever so nicely into the chili..yum.


 Happy Cooking!…..Enjoy!